Overriding Components using 'cxOutletRef' Directive | Spartacus
If you have come here, it means you know a bit or two about SAP’s Spartacus Angular Framework. In the last article, I have given a basic context required to start the development with Spartacus.
Now, in this article, we will see how we can replace existing (or out-of-the-box) components in the Spartacus module with the custom components using one of the many options, which is cxOutletRef.
Article Assumes
- Have Angular Knowledge
- Ready Spartacus Environment in your system
- Both Hybris & Angular Storefront running
Okay! So, let’s get started!
Usage
We will be replacing the default SAP logo with the new logo from our local assets. There are 2 ways to achieve this:
Recommendation:
Ideally, it is recommended that we should follow the first option. But, for the demonstration of overriding components using Spartacus, we will opt for the second option. Hope nobody complains!
Replacing Logo in Spartacus Angular - Only for demo*
Technicality:
cxOutletRef directive expects the slot position or template name to be passed. Every layout template in Spartacus has pre-defined slots. Here are few slots Spartacus ships with:
- header
- footer
- SiteLogo, etc.,
Example #1
For our demo, we will be using SiteLogo slot.
| |
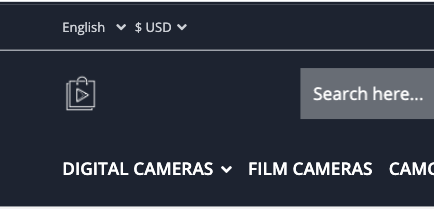
Exmaple 1 Preview
If in case, you want to replace the whole template in Spartacus. You can pass the template name to cxOutleRef direction the same as shown in the above example.
Few layout templates in Spartacus:
- LandingPage2Template
- ContentPage1Template
- ProductListPageTemplate
- ProductDetailsPageTemplate, etc.,
Note: cxOutletRef is part of OutletModule. So make sure to add it to imports in the app module.
Example #2
In case, if you do not want to touch the existing slot but want to add a new section before or after the slot, follow the below syntax with the cxOutletPos attribute.
In this example, we will be adding a new section before the footer slot.
| |

Exmaple 2 Preview
Note: If you pass after value to cxOutletPos, the section will be added after the slot section.
Example #3
In this example, we will be adding a new section after the footer slot. You may use this example for extending the copyrights section or something.
| |
Conclusion
Before concluding anything, let’s list out what we understood till now.
cxOutletRefexpects slot position or template name.cxOutletPosexpectsbeforeorafter.cxOutletRefdirective is part ofOutletModule
Hope this article helps you! Your suggestions & questions are always welcome, feel free to comment them below.